Introduction
In this project, I will demonstrate the setup of a basic home network using Cisco Packet Tracer. The network includes two PCs, one wired laptop, one wireless laptop, one printer with a static IP, one wireless phone, a switch, and a home router for wireless capabilities. This setup showcases essential networking skills such as network configuration, DHCP management, IP addressing, and connectivity testing.
Objectives
- Configure a router and a switch.
- Set up both Wi-Fi and Ethernet connections.
- Configure DHCP to dynamically assign IP addresses.
- Assign a static IP address to a printer.
- Verify connectivity and network functionality.
Network Diagram

Step 2: Connecting the Devices
- Connect Router to Switch:
- Use a copper straight-through cable to connect the GigabitEthernet0/0 port on the router to any port on the switch.
- Connect PCs and Wired Laptop to Switch:
- Use copper straight-through cables to connect each device to the switch on different ports (e.g. - FastEthernet0/1).
- Connect Home Router to Switch:
- Use a copper straight-through cable to connect the Internet port on the home router to another port on the switch (e.g - GigabitEthernet0/0).
- Connect Printer to Switch:
- Use a copper straight-through cable to connect the printer to the switch.
- Connect Wireless Devices:
- Smartphones and the wireless laptop will connect to the Home Router via Wi-Fi.
Step 3: Configuring the Router
- Assign IP Address to Router's Interface:
- Click on the router and go to the CLI tab.
- Enter the following commands:
Router> enable
Router# configure terminal
Router(config)# interface gigabitethernet0/0
Router(config-if)# ip address 192.168.1.1 255.255.255.0
Router(config-if)# no shutdown
Router(config-if)# exit
Router(config)# exit
Router#

Step 4: Configuring DHCP on the Router
- Enable DHCP:
- Enter the following commands to set up DHCP:
Router> enable
Router# configure terminal
Router(config)# ip dhcp pool HOME-NETWORK
Router(dhcp-config)# network 192.168.1.0 255.255.255.0
Router(dhcp-config)# default-router 192.168.1.1
Router(dhcp-config)# dns-server 8.8.8.8
Router(dhcp-config)# exit
Router(config)# ip dhcp excluded-address 192.168.1.1 192.168.1.10
Router(config)# exit
Router#

Step 5: Configuring the Home Router
- Assign IP Address to Home Router:
- Click on the home router and go to the GUI tab.
- Go to the Setup page.
- Set the Router IP to 192.168.1.2 with a subnet mask of 255.255.255.0.
- Disable the DHCP Server on the home router.

- Scroll down to save settings
- Configure Wi-Fi Settings:
- Go to the Wireless tab.
- Set the SSID (e.g., HomeNetwork).
- Configure Security Mode to WPA2 Personal and set a Passphrase.


- Again, scroll down on each section and save settings
Step 6: Configuring PCs and Wireless Devices
- PCs and Wired Laptop:
- Click on each device, go to the Desktop tab, and then to IP Configuration.
- Set IP Configuration to DHCP to receive an IP address from the router.


- Do that for other PC and wired Device
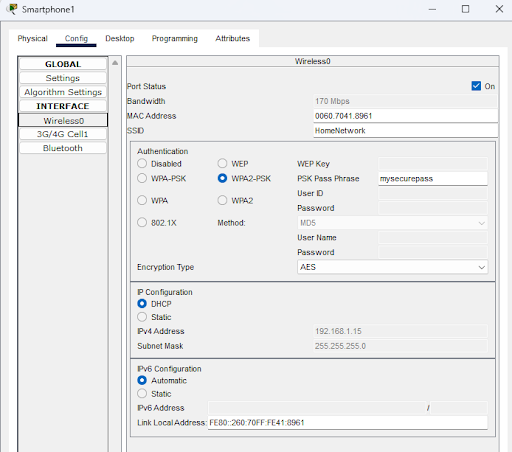
- Click on each wireless device, go to the Config tab, and under Wireless, connect to the HomeNetwork Wi-Fi.
- Enter the Wi-Fi passphrase to connect.
Step 7: Assigning Static IP Address to the Printer
- Printer:
- Click on the printer, go to the Config tab, and then to Settings.
- Set the IP Configuration to Static.
- Assign default gateway 192.168.1.1.
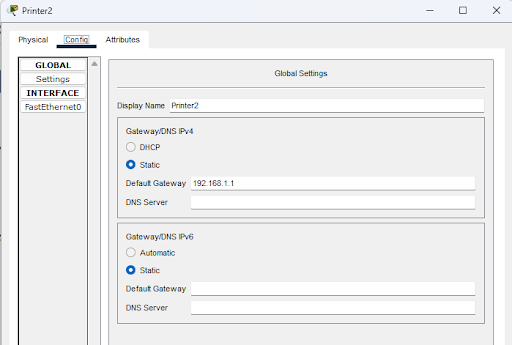
- Go to interface settings and set an IP address (e.g., 192.168.1.17) with a subnet mask of 255.255.255.0 and

Step 8: Verifying the Configuration
- Test Connectivity:
- From any PC, open the Command Prompt and ping the router (192.168.1.1), other PCs, the home router (192.168.1.2), and the printer (192.168.1.17) to ensure all devices are connected correctly.


The .pkt file can be downloaded here: GitHub.
Conclusion
And there you have it, folks! 🎉 You've just built your very own home network from scratch using Cisco Packet Tracer. We've got PCs and laptops jamming on Ethernet, smartphones and laptops grooving on Wi-Fi, and a printer that's rocking a static IP like a pro. This setup isn't just a techie wonderland; it's a showcase of your networking prowess.
From configuring routers to setting up DHCP and assigning static IPs, you've navigated the labyrinth of network setup like a seasoned wizard. 🧙♂️ You've connected devices, tested connectivity. This project is more than a demonstration; it's a statement that you know your stuff and can handle real-world networking challenges.
So go ahead, pat yourself on the back, and show off this masterpiece. Whether you're impressing potential employers, wowing your classmates, or just basking in the glow of your own awesomeness, you've earned it. Keep rocking those networks, and remember, the sky's the limit! 🚀
